Next.js 14 Deployment to VPS with GitHub Actions CI/CD
Learn how to streamline your web development workflow by deploying Next.js 14 to a Virtual Private Server (VPS) effortlessly with the power of GitHub Actions Continuous Integration/Continuous Deployment (CI/CD).
My Notes:
1) Create A NextJS 14 App
npx create-next-app@latest
Now that you have a fully working website, we need to publish it on Github.
2) Create GitHub Repository
It can be public or private.
3) Create Digital Ocean Droplet – VPS
Ubuntu System Requirements
The recommended minimum system requirements are:
- CPU: 1 gigahertz or better
- RAM: 1 gigabyte or more
- Disk: a minimum of 2.5 gigabytes
Source: https://ubuntu.com/server/docs/installation
4) Create SSH Keys
SSH keys have password authentication disabled by default. This makes them secure against brute-force attacks.
- Create a folder to store the SSH Keys
- Create Keys – Created on Droplet Create (follow instructions)
- add Pub Key to Droplet on creation
Setup Reserved IP
(A DigitalOcean Reserved IP address is a publicly-accessible static IP address that you can assign to a Droplet and then reassign to another Droplet later, as needed.)
SSH to Server
To connect to your server you can use your the ipv4 or Reserved IP from your dashboard.
ssh root@[you-ip-address]
Download and install updates for outdated packages and dependency’s on the system.
sudo apt update
sudo apt upgrade -y
Create a New User
adduser [username]
set password: [your user password]
usermod -aG sudo [username]
usermod: This is the command itself, which is used to modify user accounts.
-aG: These are options/flags that modify the behavior of the usermod command:
-a: This option stands for “append” and is used to add the user to the specified groups without removing them from any existing groups.-G: This option is followed by a list of groups to which you want to add the user.
pwd
sudo su - [username]
5) Create Github Workflow
SSH to server and run the instructions from Github.
Install Packages
sudo su [username]
Install NodeJs – Go to Option 3:
https://www.digitalocean.com/community/tutorials/how-to-install-node-js-on-ubuntu-20-04
sudo apt install npm
sudo npm install pm2 -g

If UUID error: deprecated [email protected]: Please upgrade  to version 7 or higher.
npm install uuid@latest
pm2 start npm --name "nextjs" -- start --watch
Navigate to
cd /home/[username]/actions-runner

sudo ./svc.sh install
sudo ./svc.sh status
sudo ./svc.sh start
sudo ./svc.sh stop
pm2 startup
pm2 save
# Graceful shutdown in 1 minute
shutdown

# Cancel a scheduled shutdown
shutdown -c
6) Reverse Proxy
Use the following Digital Ocean Guide up to
sudo systemctl restart nginx
7) Point Domain name A records
- A record to IP
- A record with www to IP
8) SSL
To setup the SSL follow: How to secure Nginx with let’s encrypt on ubuntu 20-04
Nice to know: How to setup a firewall with ufw on ubuntu and debian clud server
9) Extra
If you want to redirect www.my-website.com to my-website.com, remove www.my-website.com from the server_name line, and save and exit the file.
server {
    . . .
    server_name my-website.com www.my-website.com
    . . .
}
sudo systemctl reload nginx
Firewall
Make sure that your firewall allows HTTPS traffic.
sudo ufw status
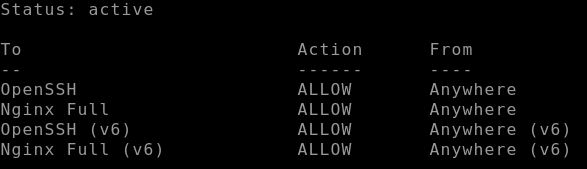
If your ufw is disabled:
sudo ufw enable
Setup basic Firewall
sudo ufw allow OpenSSH
Last thing, make sure that you have port 443 open.
Other useful commands
sudo chown -R rad:rad /home/rad/actions-runner/website/NextJs-Droplet/NextJs-Droplet
You can use the ps -ef command to see which user account the process is running under.

Check to see if PM2 uses Rad user
sudo -u rad pm2 reload 0

pm2 kill

Remove Folder
rm -rf [folder name]
That’s all.
Node.js.yml + Dot.env Example and Reload
name: Node.js CI

on:
  push:
    branches: [ "main" ]

jobs:
  build:
    runs-on: self-hosted

    strategy:
      matrix:
        node-version: [20.10.0]

    steps:
    - name: Checkout code
      uses: actions/checkout@v3

    - name: Set up Node.js
      uses: actions/setup-node@v3
      with:
        node-version: ${{ matrix.node-version }}
        cache: 'npm'

    - name: Install dependencies
      run: npm ci

    - name: Create env file
      run: |
        echo "NEXT_WEBSITE_URL=${{ secrets.NEXT_WEBSITE_URL }}" >> .env.production
        echo "NEXT_PUBLIC_NEXT_GA_TRACKING_ID=${{ secrets.NEXT_PUBLIC_NEXT_GA_TRACKING_ID }}" >> .env.production
      working-directory: ${{ github.workspace }}

    - name: Print contents of .env.production file
      run: cat .env.production

    - name: Build
      run: npm run build --if-present

    - name: Change Directory
      run: cd /home/ubuntu/actions-runner/_work/YOUR_PROJECT_NAME/YOUR_PROJECT_NAME
- run: pm2 reload 0 Support This Work
If you found this guide helpful, consider supporting me with a small donation. Your contribution helps me keep these tutorials up to date and create more quality content.

Scan to donate
Author
Hi! I’m Raddy. I am a web developer, often making YouTube Videos, Blog Posts and side projects. Enquiries: hello [@] raddy.co.uk